Welcome to the first episode of our CamTrackAR masterclass! In this tutorial, we’ll take you through how to get started with CamTrackAR – from its benefits to its basic controls and even how to use it to record footage against a green screen!
What is CamTrackAR?
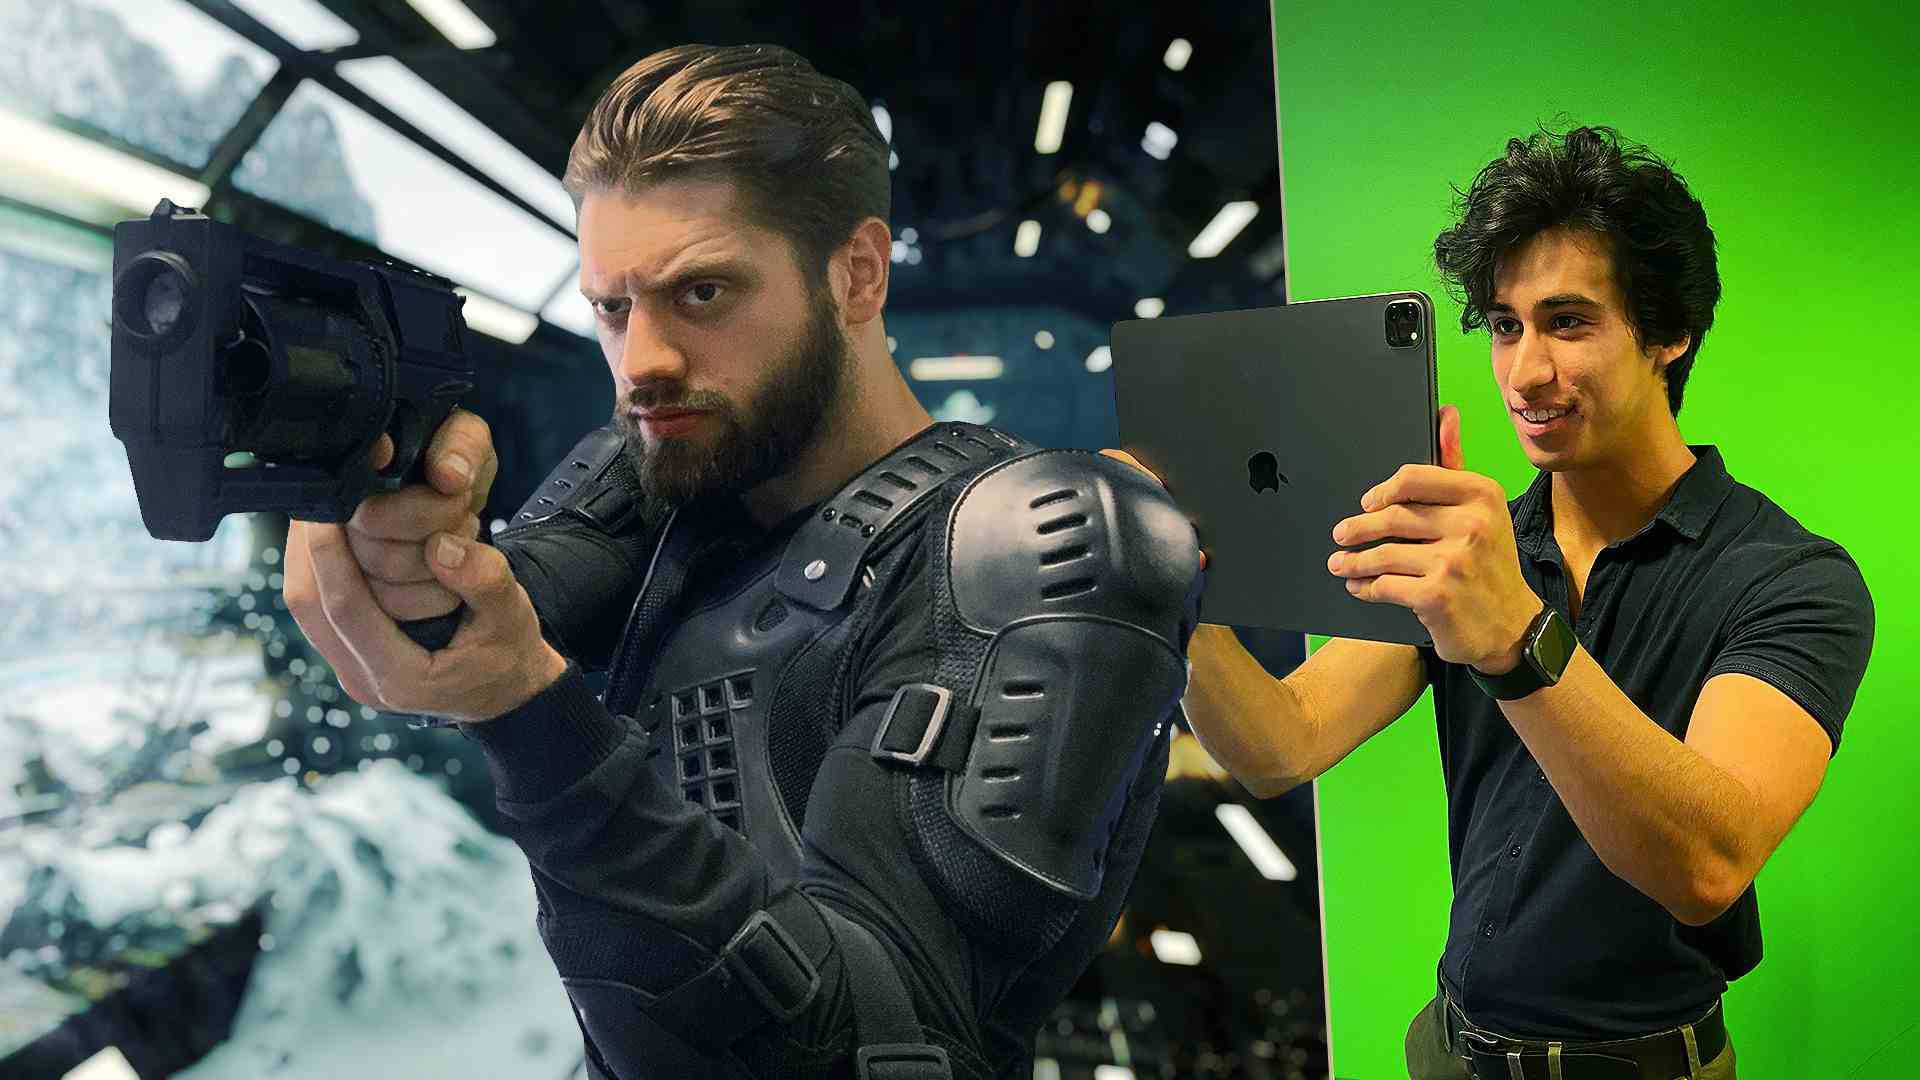
Motion tracking is a cornerstone of creating visual effects. It is the act of replicating the camera’s motion so that your effects match the movement of your footage. Without motion tracking, you risk causing the effects not to look integrated into the scene.
Before CamTrackAR, the process of motion tracking was done in post-production and was a manual step in the workflow. Essentially, a computer would be used to do it, but you would have to kickstart the process and make corrections, adjusting the settings when the footage isn’t tracked correctly. This can make motion tracking difficult and time-consuming as things such as motion blur can sometimes completely invalidate a good track, resulting in you having to manually do it frame-by-frame.
So what does CamTrackAR do differently? CamTrackAR simultaneously records your tracking data and footage. This means that when it comes time to composite the shot, you can skip that entire step of motion tracking. CamTrackAR also has numerous features to previsualize the VFX before you start shooting, making it easier to communicate your ideas to your colleagues and get a better idea of the final result earlier in the production process.
Where can I download CamTrackAR?
You can install CamTrackAR on your iOS device* like any other app from the official App Store. The free version of CamTrackAR includes free export to HitFilm and Blender and 1 point anchor in the app.
The paid version of CamTrackAR gives you access to several professional, high-end features, most of which were added in the recent update. These features include:
- Export to more formats: After Effects, Autodesk FBX export, and full export of the raw data to Plain Text, like JSON (.json) and CSV (.csv).
- Multiple positioning points while using the app.
- Live Chroma Key capabilities.
- The ability to import 3D models in real time with 3D USDZ and Image import.
- You also get access to all future updates for the app itself.
You can get access to CamTrackAR through either a subscription for $4.99 a month or a one-time purchase of $29.99.
Now with that all cleared up, let’s take a look at CamTrackAR in action.
How do I use the app?

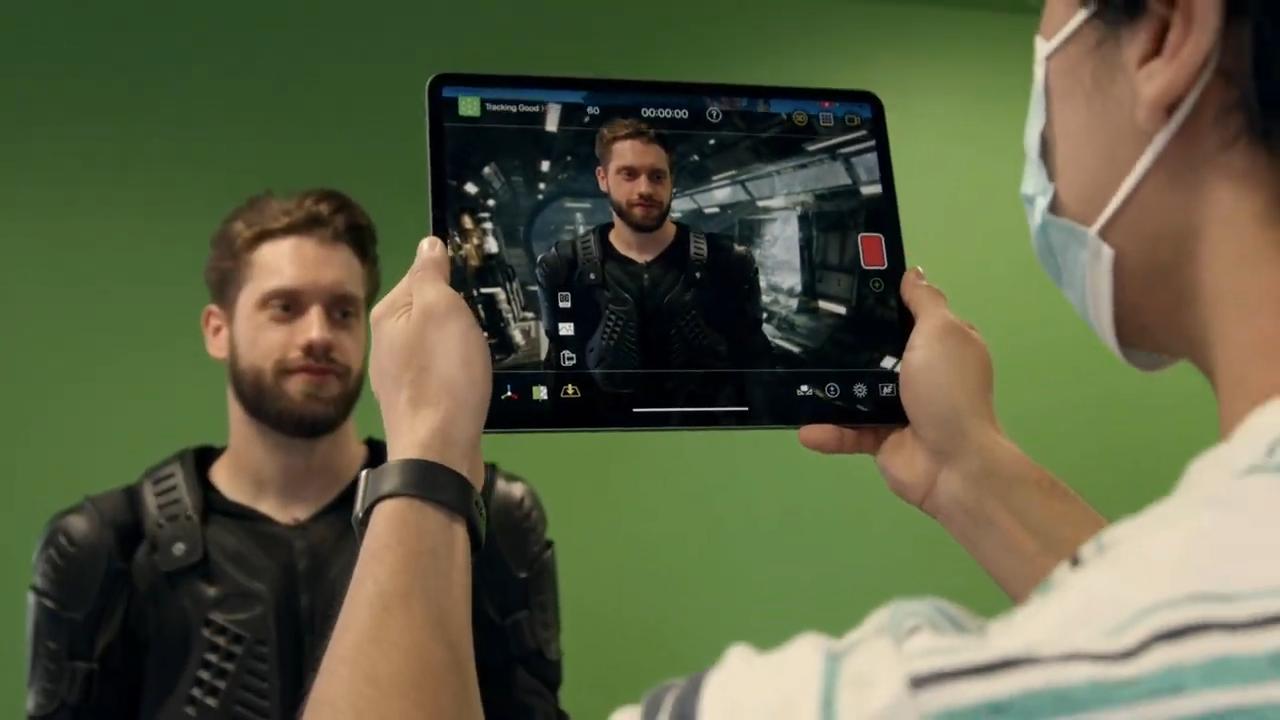
No matter what the end result of using CamTrackAR ends up being, the first step is to always scan the scene, just by walking around and pointing the camera at different things. This helps ARKit get familiar with your location, and build a reference for how the environment is laid out. The 
 Tracking icon in the top left alerts you of the progress of the scan. You can reset the Tracking data and start again by tapping this icon.
Once your scene has been scanned, you can set the floor plane by pointing your device at it and hitting the 
 button.
Tapping the number 60 in the top left corner allows you to adjust the recording frame rate to better suit your edit. However, you’re limited to recording in HD at the moment due to the limitations of ARKit but we’re working with Apple to open up more options on available devices.
In the top center of the interface is the timecode which will start counting when you record. The 
 icon will open up the CamTrackAR manual in your browser which is handy if you need to quickly check what an icon means or need more instructions.
The icons in the bottom right of the interface give you more control of how the camera functions before you hit record

 controls the white balance. You can turn on and off the auto function and scroll the wheel to set a custom Kelvin temperature.
 controls the exposure. You can toggle the wheel to brighten or darken your scene.
 is a button that activates or disables Auto Exposure.
 is a button that activates or disables the autofocus function. You can set the focus by enabling it, allowing the camera to focus, then disabling the auto function.
We recommend that you turn off these auto settings when using the Chroma Keying function in CamTrackAR – changes that occur while filming can negatively effect the quality of the key.
To key out a green screen in real-time select the 
 icon. Once selected, a tab will open containing several sliders that control the strength of the key. On the right of that icon is the Import icon, which lets you import USDZ 3D models or images from your Files or Albums into the 3D space. After clicking the icon and choosing the desired item, the item will appear on the target in the 3D world and will move around with the target as though it’s stuck to it. To adjust the position and orientation of a model or image:
- Swipe your finger horizontally across the screen to rotate the object.
- Pinch the screen to scale it up or down in size.
- Use 2 fingers and swipe vertically on the screen to raise or lower the object.
- If you want to put the item back on the floor after adjusting the altitude, double-tap the screen to reset its position on the floor.
If you find the view is getting cluttered, use the following icons in the top right of the screen to adjust what appears:
- The
 icon controls the view of the 3D world.
 - The
 button controls the visibility of helper overlays, like the gridlines.
 - The
 icon turns on and off the camera feed.
 icon controls the view of the 3D world.
  button controls the visibility of helper overlays, like the gridlines.
  icon turns on and off the camera feed.
Depending on how you want the final VFX shot to look, it might be helpful to have an anchor point. Anchor points store position data – this data can be used later to position 3D models in your scene.
When you’re ready to record, hit the 
 button. Please note that the only things recorded are the raw camera feed and the tracking data. Any Chroma Key or models you’ve placed into your scene won’t be recorded into the shot as they are just used for pre-vis.
When you’ve finished recording, a popup will notify you that the files have been saved on your device. These files can be found in the Files app. To access the files on your computer, we recommend that you compress the folder first and send it to yourself using email, etc. You can also just send the individual files you need if you want to save space.
With your files on your computer, you can begin the compositing process – we will cover that process in the next episodes of this masterclass. We’ll take a look at HitFilm, After Effects, Blender, as well as Unreal Engine. See you next time!
*Please note that the reason CamTrackAR can only be used on iOS devices currently is down to the AR camera data we are able to pull from Apple’s hardware technology. We started with ARKit, which is amazingly good, and we are actively talking to Google about the best way forward for Android – so stay tuned!